
A Guide to Day Hiking Half Dome
Half Dome is one of the most iconic and beautiful day hikes in the United States. It’s located in majestic Yosemite National Park. The hike features a stunning waterfall-lined trail, wildflowers, granite staircases, and an exhilarating climb of a 400 ft. rock.
While Half Dome is one of the most popular day hikes in Yosemite, it’s not a walk in the park— it’s a very strenuous, full day hike. The route is 14-17 miles round trip (dependent on route) with several very exposed areas.
This hike will challenge your comfort zone.
Many people that complete the trek to the top of Half Dome will tell you that it’s a life-changing experience. It will humble and empower you all in one (difficult) breath.
Half Dome is pretty special to me because it was my very first summit. It taught me a lot about myself and launched me into the world of hiking. You can read more about my experience here.
The second time I hiked Half Dome I was an experienced hiker and backpacker. The experience was humbling, and I didn’t summit. Rather, I spent my day helping a girl in my group safely descend when she had a panic attack on the cables.
Both of my experiences on Half Dome taught me a lot. I believe Half Dome is one of the most invigorating, rewarding hikes you can experience. But I also believe there’s a lot of things you should know before tackling this trek to ensure your safety and enjoyment!

In this blog post, you’ll find everything you need to know about day hiking Half Dome. Click on any of the links below to jump to each section.
Half Dome Stats
Permit Information
Preparing for Your Hike
What To Pack
Full Day Hike Overview

Half Dome Hike Stats:
Miles:
14-17 miles depending on route
Elevation profile:
~4,800 ft. total elevation gain
The hike has about 4,400 ft of gain
The cables have about 400 ft of elevation gain.
Trailhead: 4000’
Top of Nevada falls: 6000’
Top of Sub Dome: 7940’
Summit of Half Dome: 8839’
Difficulty: Difficult/Strenuous
Permit: Required for day hikes & overnights for sub-dome and cables.
To reserve a permit, click here. Find detailed permit info below.
Fees: The permit will cost you $10, plus $10 per person. Yosemite National Park also charges a park entrance fee of $30.
Trailhead: Happy Isles
Trailhead coordinates: 37.732178, -119.558036
Map/GPSX: Click here to purchase a paper map
AllTrails link
Gaia GPS link
Water sources: Water should be filtered
sources include various points on the Merced River
*be mindful of where you fill up and always approach water sources with caution
Weather: check the weather here
Time needed: This is a full day, strenuous hike.
Time required depends on fitness level, desired hike experience (# of breaks, photo stops, etc), hiking experience, and amount of people on trail. The NPS states that it typically takes anywhere from 9-14 hours to complete the hike.

Half Dome from Glacier Point
When Can I Hike Half Dome?:
The Half Dome cables are up for about 5 months out of the year, during summer.
According to the National Park website, “The Half Dome cables are put up each spring and taken down each fall, typically from the Friday before Memorial Day through the Tuesday after Columbus Day. These dates are conditions dependent and may vary from year to year.”
For the 2021 season, the NPS anticipates that the cables will be up from May 28, 2021 through October 12, 2021.
Permits:
You must have a permit to hike the sub-dome and cable section of Half Dome. You may hike up until the sub-dome without a permit. A ranger is stationed at the base of the sub-dome to check permits.
Permits are available by two lottery processes, a preseason lottery and a two day advance daily lottery system. About 200 permits are available for each day the cables are up via the preseason lottery. At least 50 permits are available for each daily lottery.
The preseason lottery application is open from March 1 through March 31 of each year. Notification of results from this lottery are generally given by the second week of April.
One person (called the team leader) can apply for up to six people for seven different dates. The team leader is only allowed to apply once per lottery.
The daily lotteries have an application period two days prior to the hiking date with a notification late that night. So, for example you could get a permit for Saturday July 17, by applying for it on Thursday July 15.
The daily lottery only allows for a trip leader and no alternates.
Permits cost $10 per application, regardless of the number of people listed on the application. If your permit is approved, you must pay a permit fee of $10 per person. The $10 fee is fully refundable if you cancel your permit by 9 pm Pacific time the day before your hiking date
To reserve a permit, click here.
P.S. if you still have questions, you can call Yosemite National Park at (209) 372-0826 (Monday-Friday, 9 am to noon and 1 pm to 4:30 pm, March through early October).
A Full Guide to Day Hiking Half Dome
How can I prepare for my hike?
Once you’ve secured a permit for hiking Half Dome, you should start preparing for the hike. Preparing for a day hike of Half Dome is multi-fold and involves both physical and mental preparation.
As with any day hike, you should start training by walking, hiking, and generally exercising to make the 16.5 mile trek more enjoyable. I would definitely recommend getting in a few hikes around the 15 mile mark before your hike. Unlike most other hikes, you’ll also need upper body strength for the cable section of the hike. As a result, I recommend doing a push up routine or other upper body strength routine.
I also recommend hiking at altitude the day before your hike to help prevent altitude sickness.
For mental preparation, you’re already starting off well by doing research and reading up on the hike. I find that oftentimes the mental side of this hike is scary because people don’t generally know what to expect. By reading a few guides, watching videos, or talking to people that have previously hiked you can reduce your anxiety and set expectations for the hike. If you keep reading this blog, there’s a full description of the hike and tips for conquering the scariest section: the cables. I also recommend watching this video by the National Park service. This guide from the NPS also covers everything you’ll need to know about the hike.
What time should I start my hike?
The time required to hike Half Dome will depend on your hiking experience, desired wilderness experience (meaning number of breaks), and how crowded the cables are.
Your permit is good from 12:00 AM on the date it was issued for, so you can leave as early as you want. Most people are advised to start early— before 6 a.m.
When I hiked Half Dome, we started the trek between 3:00-4:00 a.m.
Starting early will give you ample time to hike 16.5 miles, and you’ll do the majority of the climb in the early morning when it is cooler. This also puts you in a good position to summit Half Dome, and be down safely from the sub-dome before afternoon thunderstorms are likely to occur.
I would recommend making your summit turn around time 1 p.m.
Since I’d recommend an early start, I do not recommend relying on Yosemite’s Shuttle service, as rides don’t begin until 7 a.m.
What should I pack?
Click here for my blog post detailing everything you need to pack for a day hike of Half Dome!
Here’s a few important highlights:
Permit: A permit is required for the sub-dome and cables section. Print your permit or take a screen shot of the email on your phone. There’s no service where your permit will be checked.
Shoes: make sure you have shoes with good grip that you’ve broken in on other hiking trips
Gloves: I highly recommend getting gloves for the cables section. I used Gardening gloves.
Water: I recommend carrying 4 L of water for the full Half Dome hike. I also suggest getting a water filter for backup, or to enable you to carry less water for your hike.
10 essentials: As with any day hike, it’s vital that you carry your 10 essentials. Click here for a great blog post by REI.
How do I get to the trailhead?
Accommodations for the night before your hike are not included with your Half Dome permit. You may enter the park at any time, but you are not allowed to sleep in the park without reservations. If you enter the park before 8 a.m. you won’t have to pay an entrance fee, but you may be stopped on your way out of the park to pay.
The hike begins at the Mist Trail. To park before your hike, you must park at the Yosemite Valley Trailhead, located just past Half Dome Village. From this lot, you’ll walk about a ½ mile to the Happy Isles Bridge, where your hike technically begins. If the Yosemite Valley Trailhead is full, you may also park at the Half Dome Village, which is ¾ mile to the trailhead.
The next section of this blog contains a detailed overview of the day hike with tips and tricks for each section.
Trip Overview
The hike can be broken down into a few sections:
first is the waterfall lined Mist trail
then you’ll walk along the Merced river and through a forested section of trail— this is the last section with a water source and last section with any real shade
then the sub-dome (this is where permits will be checked)
finally you’ll arrive at the cables and climb to the top of Half Dome
the trail is an out-and-back style trail, meaning you can retrace your footsteps to get back to the trailhead
For the 2021 season, descending the Mist Trail steps from the top of Vernal Fall is prohibited from 9 am to 4 pm. If you descend before 4 pm you must take the JMT alternate
The hike starts with a paved, steady incline to warm up your legs for the 4,800+ feet of elevation gain ahead of you. You’ll walk the paved path for a while, until you cross over a footbridge. Flush toilets are available at the Vernal Fall Footbridge (below Vernal Fall).
After hiking for 1.5 miles, you’ll arrive at Vernal Falls. Remember that it’s called the Mist Trail for a reason- this portion of the trail can get you wet. The granite staircases can also get very slippery, so be mindful!

View of Vernal Falls from the Mist Trail

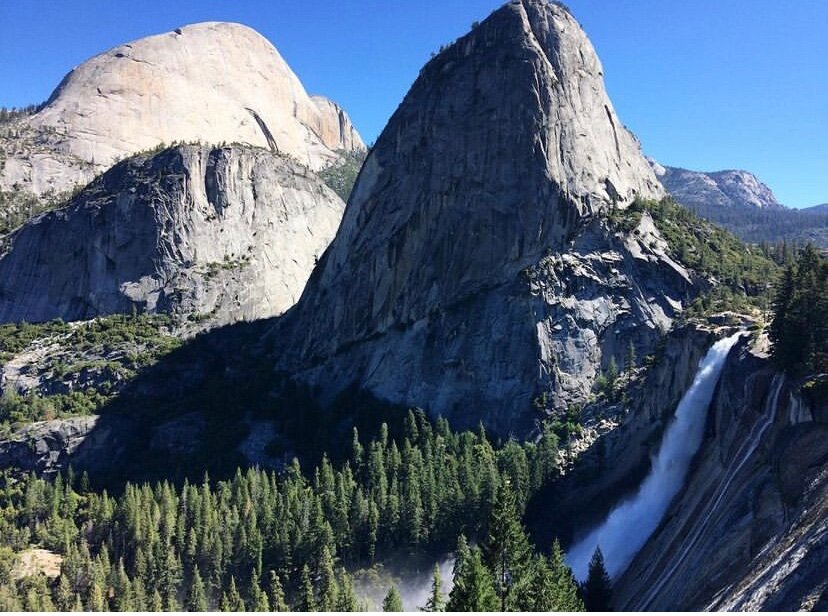
After you’ve taken in the views of Vernal Falls, you’ll continue to climb. You’ll cross another hiker footbridge, and walk through a lovely forested section of trail. After about two miles more, you’ll reach Nevada Falls.

After you’ve soaked in the views of Nevada Falls, you’ll walk up a series of steep switchbacks.
At the top of Nevada Falls, 4.3 miles into your trek, you will have climbed the first 2000 ft of elevation, with 2800 ft left.
At the top of Nevada Falls, the trail splits. Follow clearly marked signs and head left to continue on to Half Dome. Once you’ve reached this sign, the previous granite rock stairways give way to sandier, flatter trail and you’ve completed the first big climb of the trail. The trail runs parallel to the Merced River through Little Yosemite Valley and a backpacker campground. Follow signs towards Half Dome.

Eventually, the trail switchbacks gently up to the top of the sub-dome, and once again turns to a granite playground. A ranger will be sitting at the base of the sub-dome, checking permits. If you do not have a permit, you are allowed to hike until this point where the ranger will turn you around.

Once you’ve gotten your permit checked, you can continue to hike up staircases on the sub-dome.
The sub-dome sits at about 8,000 feet and is pretty exposed. This is one of the first points that may test your fear of heights along the trail. In fact, some people actually find the sub-dome a little scarier than the cables, because it is equally as exposed (while not as steep) without the grounding of having cables and four points of contact. As you head up the sub-dome, you may catch glimpses of the final cable section of the hike ahead of you.

Once you’ve gotten over the sub-dome, you’ll be left with a stunning view of the Half Dome Cables.

The Half Dome cables are built with two cables to hold on to, attached to the rock by steel poles, and there are wooden planks nailed to the rock to help secure your footing as you climb.
Depending on the amount of people on the cables at the same time as you and your own body strength/comfort, it can take 30 minutes to an hour to get up the cable section.
There is one lane going up, and one lane going down, which means you can only go as fast as the lines are moving. When someone is descending while you are ascending, you can simply put both hands on one cable and step to the side for them. Do not go around the outside of the cables to pass someone.

Before heading up the cables, I highly recommend taking a break to drink water, eat a snack, and reapply sunscreen.
Additionally, please take the time to secure everything to your pack and move as many of your items to the inside of your pack as possible before you begin up the cables. This is important to prevent things from falling off your pack at the people below you.
I do not recommend leaving your backpack at the sub-dome below the cables as animals can chew through your pack. I do however recommend leaving your trekking poles here.

A few notes about the cables:
Make sure you have gloves for the cables section. I used gardening gloves.
Make sure you secure everything in your backpack before starting the cables.
Do not attempt the cables if it has recently rained.
Do not attempt the cables if there are clouds/potential for thunderstorms. In the event that thunderstorms occur, hike below the tree line as quickly as possible.
Note that they’re cables, not poles. They have a little give to them, and will move back as you pull on them. This requires a decent amount of upper body strength.
There is a lane going up and a lane going down. There is no “fast lane or slow lane”— you may only move as fast as the people in front of you, so be prepared to stop and wait on an exposed incline.
When hiking the cables, move from plank to plank. Take breaks on the planks rather than stopping between planks. Do not move until the plank in front of you is undoubtedly open. Holding yourself up without the stability of a plank underneath you is significantly more challenging.
The cables have 400 ft of elevation gain. The incline of the cables starts off mild and steadily increases until the shelf just below the summit. About 3/4 of the way up, you’ll feel the most incline before leveling out again.
Collective kindness and encouragement is important. Communicate with each other along the way, and smile at one another. If you see someone get scared, take the time to encourage them.
If you have a panic attack on the cables, please know your safety is the number one priority. It is always okay to turn around. You should be proud of yourself for the journey, not the outcome.
If you have a fear of heights, make sure to communicate this to members in your group so they can support you. Some people also use a climbing harness to clip in to the cables. If you have to turn around, please do so.

From my first summit of Half Dome
Once you’ve reached the top of the Half Dome cables, plan to take a while to take in the stunning views, photograph your experience, and celebrate! The top of Half Dome is surprisingly large and flat. You’ll have sweeping 360 views, including a glimpse at Yosemite valley below you, where your day started.

Views from the summit of Half Dome

The famous “surfboard” on top of Half Dome
Descending the cables will take you anywhere from 30 minutes to an hour, depending on the amount of people on the cables and your personal strength/comfort. It is generally faster to descend than it was to ascend.
You may descend facing forward, but if you find that this is uncomfortable (like I did), try flipping around so you are facing the granite rock and using both arms to propel down. Your technique should be similar to how climbers propel down the wall from a climb.
While descending, use controlled footsteps. Do not slide and slam into each plank. Not only is sliding dangerous for you, as you could easily catch too much momentum, it is extremely scary for the other people standing on the planks going up.
Be considerate, and be safe, by making calculated steps down. Again, having shoes with a good grip is of the utmost importance for this hike.
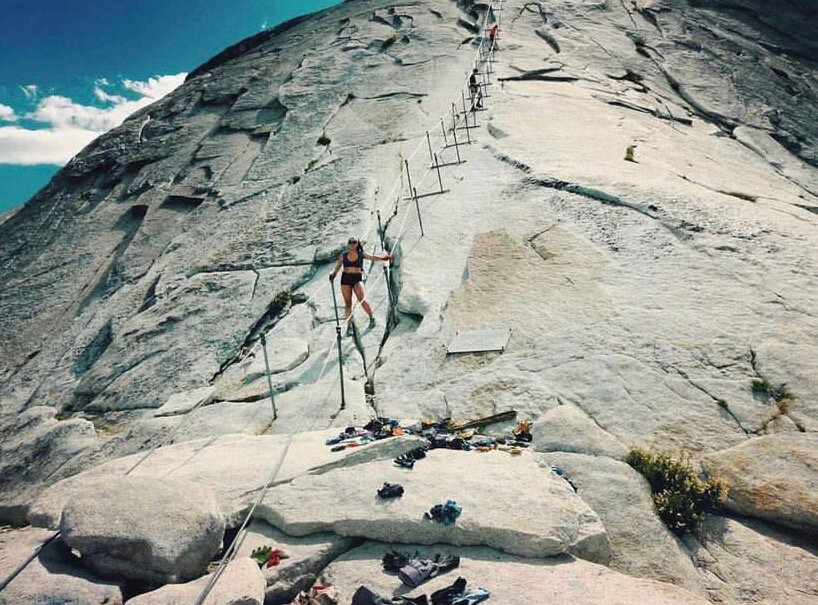
This photo of Half Dome was from 2016, before LNT principles were strictly enforced here, please do not leave your gloves at the base of the cables. Pack out all your trash!
Once you’re off the cables, you will simply retrace your steps back down to the valley. It’s always fun to take a dip in the Merced river on your way down. Please be mindful of where you swim in the river, as it does eventually turn into a waterfall and drowning is a genuine risk. We took a dip and filtered water at the backpackers camp.

When you get to the top of Nevada Falls, you have two options to get back to the Valley:
*Please note, for the 2021 season, descending the Mist Trail steps from the top of Vernal Fall is prohibited from 9 am to 4 pm. This means you must take the JMT alternate if you’re hiking down before 4 pm— this route is listed second here.
First— If you missed the views of Vernal and Nevada falls because you started your hike early or you’d just like to see them again, I highly recommend following the Mist Trail back down!

The mist trail on our way back down from Half Dome
Second— there is an option to stay to the left to go down the John Muir Trail instead of the Mist Trail. This route is slightly longer, but is considered less steep, and has less impact on your body because it is a level path instead of staircases down. It also gives you a beautiful, and different view of Nevada Falls.
View of Nevada Falls from the JMT
Hiking Half Dome is an awesome experience. It’s an adrenaline rush and a hike unlike any other. Ultimately, it will leave you feeling inspired, empowered, and ready to take on more challenges!
I hope this blog post covered everything you need to know to be fully prepared and empowered for your day hike of Half Dome.
If you have any questions, please leave me a comment!